Field tests of the next phase of monobore construction further validate its practicality
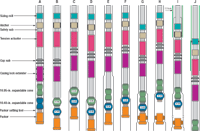
Oil Country Tubular GoodsField tests of the next phase of monobore construction further validate its practicalityA live well, drilled in late 2004, provided key data to evaluate single-trip technology for economically constructing single-diameter wells.After five years, with several hundred commercial installations in place, solid expandable tubular technology has proven to be a viable and economically feasible alternative to conventional drilling technology. This installation record, the evolving technology and applications spectrum, and the ever present need to lower lifting costs and maximize recovery have provided the impetus for the latest step-change toward the one-trip section, single-diameter wellbore. This article is a follow-up of last year’s status report on progress made on the single-diameter well in World Oil’s July 2004 issue. That introduction discussed: 1) key drivers, emphasizing potential major cost savings for well developments, particularly in deepwater wells; 2) challenges, including tubular size limits, with 9-5/8-in. being the smallest usable size, with present tubular materials; 3) the necessary creation of a “bell,” or expanded section on the bottom of the existing string, into which the smaller, landing string is expanded and sealed to extend the single-diameter string; and 4) the need to underream and maintain an annulus sufficient for cementing around the bell. In addition, the 2004 article detailed the testing of two short expansion sections in a South Texas well in 2002, creating a true single-diameter section. This monobore test required two expansions: one upward, from a pre-installed cone to expand the pipe up to the receiving pipe’s ID, and the other downward, to further expand the pipe to its final, single-diameter state and, in doing so, “over-” expand the outer pipe in the overlap section, creating a bell in the upper pipe. This second expansion for the bell is the reason for the current limitation of 9-5/8-in. expandable pipe. Smaller diameter pipe, if expanded that much, would exceed expansion (percentage) limits. That early test was studied thoroughly to see what could be improved. The newest developments described here are: 1) an all-in-one tool was built and tested to see if the two expansion trips, and more, could be done in a single trip; and 2) whether expansion against, and into, a formation would be feasible and offer sufficient zonal isolation. The tool was created by Enventure Global Technology and was tested in a live well in late 2004. This article describes these tests. It is based on discussions with Enventure personnel and from a presentation at OTC 2005.1 THE OBJECTIVE The single-diameter well has always been envisioned as the final evolutionary extension of solid expandable tubular technology. The resulting benefits from this ultra-slimmed wellbore configuration have been well documented2 and include:3 1) cost reduction – smaller riser, wellhead and BOP, smaller drilling vessel/ rig, smaller diameter casing, less drill fluids and cement; 2) reduced environmental impact: smaller environmental footprint, less cuttings/ fluids disposal; 3) operations efficiency – single drillstring, adaptable to automated drilling, optimal borehole for ROP, no drillstring changes; and 4) reservoir optimization. In recently modeled worldwide offshore and subsea developments, the system greatly reduced observed and/or forecast drilling risks and trouble time. The prudent application of successive single-diameter expanded liners has proven to increase lateral reach potential by 20% to 50% and, in select applications, these results exceed the current industry lateral reach record by over 35%.1 LIVE WELL TESTS These tests were planned and executed in late 2004 with the following primary goals: full compliance with Health, Safety and Environmental (HSE) policies; and deploy/ expand 9-5/8-in. single-diameter liners. One test was for single-diameter well construction, the others tested the merits of expansion against, and into, the formation to achieve hydraulic isolation without cement and/or mechanical isolation. All of the objectives were satisfied in these tests, which were planned and executed in a live well with a full Class III BOP stack, HSE systems, closed-loop mud system and zero-discharge tolerance. A tool string, as illustrated in the figure, comprises seven major components and three minor components, from top to bottom:
Single-trip test procedure. The following series of steps were performed to test the new toolstring – a single trip, all-in-one, tool that can form both the bell and expand the casing run, as well as provide for contingencies. For the surface strings, a 20-in. surface conductor was set at 101 ft, followed by 16-in structural casing, set at 450 ft. A special 11-3/4-in. surface casing was set at 2,098 ft. This string comprised 65 lb, L80 casing and three joints of proprietary, expandable 47-lb, LSX-80 casing and connections. These three joints were chosen so that their ID would match the expanded OD of the final single-diameter string. In other words, it served as the shoe track and bell, without actually being bell-shaped. An actual pre-formed bell would serve the same purpose, namely, allowing for cladding back the subsequent single-diameter liner with a metal-to-metal expansion and 100% hydraulic seal. A pendulum assembly with a 10.25-in. rock bit and near-bit reamer, pinned for a 12-1/2-in. hole, drilled over 500-ft of hole for subsequent deployment of 9-5/8-in., 36-lb, LSX-80 expandable liner. After cementing the surface casing, the shoe track was drilled out with a 10.25-in. bit, short collar and 1° bent sub. This cleaned out cement without damaging the surface casing, which was subsequently used to expand against with the expanded liner. Ideally, this cleanout step should be part of a single-trip expansion deployment, perhaps achieved with a near-bit reamer. Using specialized casing-handling equipment, which is required for expandable tubulars, the first two casing joints were run into the hole, with the bottom part of the monobore tool-string assembly pre-installed and locked against the inside of the casing. This section of the tool, from the safety sub down, comprised the extender, setting tool, both expansion cones, and the packer (see figure).
Using a false rotary table, several more joints of casing were then run into the hole, followed by the rest of the toolstring, which is threaded onto the bottom portion of the tool. Both casing and toolstring are simultaneously run into the hole to bottom on drillstring/ toolstring, with the casing lock supporting the vertical casing load. The packer is also pinned to the casing, which holds the extender pipe and cones in the up (retracted) position. Referring to the figure:
Casing evaluation logs were then run, indicating uniform expansion IDs, with minimal-to-no ovality and minimal distortion of the cutting face. Second test. This test was performed to evaluate expansion against, and expansion into, shallow Gulf Coast gumbo-laden formations. This test required drilling at least three separate hole diameters. A 9-5/8-in., LSX-80 expandable casing was expanded to a 10.4-in. ID and an 11.0-in. OD. The 10.25 x 12.5-in. drilling assembly was used to drill the first 120 ft of large hole as a fail-safe. Based on previous drilling results, a 9-7/8-in. bit with a straight hole motor was employed at low pump rates to control drill the next 200-ft section to limit washouts and obtain a continuous interval of 10.3 to 10.6-in. hole diameter for the expansion into the formation test. The next 50 ft section was drilled with a 10.25-in. bit and 10.4-in. near-bit reamer to achieve a 10.77 to 11.0-in. hole diameter for the expansion against formation test. It was necessary to perform several isolated near-bit reamer runs to achieve the desired continuous hole diameters for the test, as confirmed by openhole mechanical/ acoustical caliper logs. Once the formation strength was obtained, sidewall cores were taken every 2 ft throughout the planned expansion interval for later analysis. The expandable liner was run as in the initial test, but with a modified expansion string and a single, solid, expansion-cone assembly. Once on bottom, the liner was mechanically expanded to just above the planned expansion interval, and the tools were pulled. Prior to removing the non-expanded casing, the expanded liner was logged with an acoustic caliper and bond log suite that indicated highly uniform expansion diameter with limited to no ovality, and a 100% bond index throughout the expansion into the formation interval. This test confirmed a 100% hydraulic seal without cement or mechanical isolation.1 SUMMARY For the single-trip bell formation, casing expansion test, significant engineering and operational lessons were learned, furthering the tool development and testing efforts of the last several years. Although a single-diameter well was not attempted, the test successfully demonstrated positive results on several objectives, including: drilling operations; emergency release; a bell section formed, and a full, successful, single-diameter liner expansion using the mechanical jacking method. These raised the team’s confidence in the single- trip concept. For the expansion against and into the formation, the tests confirmed the feasibility of doing this, and logging data indicated that isolation had been achieved. Click here for a complete list of World Oil’s annual expandable technology reports.
|
- Coiled tubing drilling’s role in the energy transition (March 2024)
- Advancing offshore decarbonization through electrification of FPSOs (March 2024)
- Subsea technology- Corrosion monitoring: From failure to success (February 2024)
- Using data to create new completion efficiencies (February 2024)
- Digital tool kit enhances real-time decision-making to improve drilling efficiency and performance (February 2024)
- E&P outside the U.S. maintains a disciplined pace (February 2024)